|
Experiential learning resources for the innovative educator
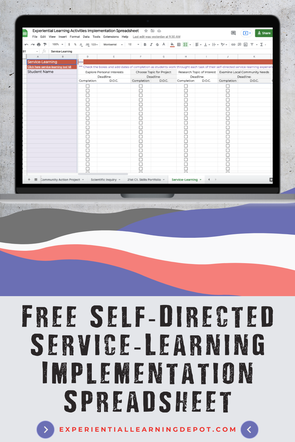
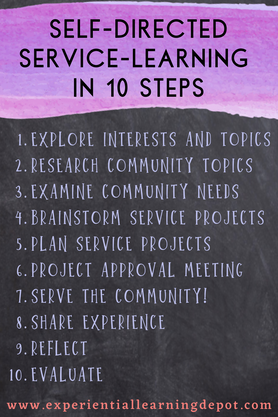
Implementing service-learning projects for high school students is so important on so many levels. As an experiential educator, I have found service-learning to be experiential by nature, as students get involved in real-world, community-based issues that are personally relevant, meaningful, or interesting to every student. The learning experience is even more profound when it is self-directed; when students choose their own topics or issues that impact their local communities, examine community needs associated with the topic or issue, brainstorm ways that they themselves can serve to fill the need, and coordinate and execute those service experiences. Self-Directed Service-Learning Projects for High School Students in 10 Easy StepsLet's take a quick step back. What is service-learning that is student-led anyway? Self-directed service-learning is when students design and execute acts of service based on a local community need. Self-directed service-learning experiences are important for students, high school students in particular, for many reasons. Service-learning projects promote character-building, empathy, awareness of local community issues, 21st-century skill-building, resume building, and so much more. The personalized, self-directed nature of these experiences most importantly, in my opinion, get high school students outside of their bubbles, investing in their communities. So how do you manage and facilitate personalized service-learning experiences in your high school classroom or homeschool? First, I'm going to offer you some implementation suggestions. Then I'm going to go over the steps my high school classroom students take to design and execute self-directed service-learning projects from start to finish. Self-Directed Service-Learning Project Implementation Tips: 1. Cooperative Learning: I highly recommend having students develop service-learning experiences in small groups. Service-learning can certainly be done independently, but many service-learning experiences require many hands. That team vibe is helpful. It is also a nice way to help you better manage projects. If your class has 30 students and each student is doing their own service-learning project, you will have 30 projects to oversee. That could get overwhelming. Break your class into groups of 5 students and then you will only have 6 projects to manage. 2. Project Approvals: Some of your students may be new to service-learning, and most of them could be brand new to self-directed service-learning. I highly recommend looking over and approving project proposals before sending students off to serve the community. It’s great feedback for them and also ensures responsible, time-effective, realistic projects and outcomes. 3. Time-Management: Service-learning projects take time. A service-learning project could be an ongoing experience, take several months, or several weeks. But completing a service-project cannot be completed in a couple of hours. That’s important to know before diving into an experience like this. I would plan for at least 2 weeks. Share a timeline or deadline with students and have them plan service-learning projects that can be done in the amount of time assigned. 4. Project Location: Some teachers and students may have a lot of flexibility as far as leaving the classroom or home to travel to the worksite or meet with a collaborator, for example. But others do not. If you do not have the option of leaving the classroom or allowing your students to leave independently, set that expectation from the start. Tell students that they need to design projects that do not require leaving the building. There are many options. Kids will get creative, which is an awesome skill-building opportunity in itself. 5. Incorporating Content or Standards: Again, self-directed learning is great because of the flexibility. If you need students to focus on a specific concept or standard, make this known before they begin designing their service experiences. For example, if you are an environmental science teacher, rather than make the service open-ended, ask that students design their projects around whatever environmental concept you are covering at the time. 6. Progress Check and Feedback: Incorporate a check-in and feedback system. Self-directed service-learning is designed to support independent work, but you will still need to guide, facilitate, and manage their projects. Make sure to check in with each student or group daily. I have had students fill in daily check-in forms, done one-on-one meetings with each student or small group once per week, and have done something called project circles where we all get together and share progress with the group. 7. Free Service-Learning Implementation Spreadsheet: A great way to manage individual progress is with a spreadsheet. Feel free to grab my free service-learning implementation spreadsheet that has been formatted specifically for self-directed service-learning. This spreadsheet is included with a larger experiential learning free mini-bundle. Steps in Self-Directed Service-Learning Projects: My implementation process is fairly specific. Look at the steps for inspiration and adapt them as needed. The steps go along with my high school self-directed service-learning tool kit that my students use throughout the process. The tool kit guides them independently through the design and execution phases of the experience. With that said, you certainly do not need the tool kit to do student-led service-learning with your classroom or homeschooled students. The tool kit is simply to support students through the experience from start to finish and support you from a facilitation standpoint. Existing templates that streamline the process also save you time. So here we go! The steps. Try the steps out, tweak things as you go, and enjoy the outcomes! Step 1: Exploring Interests I start any self-directed learning experience by personalizing it, including service-learning. The first step, then, is giving students time to explore their interests as they relate to the local community. If they’re interested in natural disasters, for example, they would explore the topic of natural disasters and refine that topic to apply directly to the local community. For example, a student who is interested in natural disasters might focus on a relevant subtopic such as the flooding of the community river every spring. How to explore these interests? I have my students do interest surveys. You could also have students explore current events in their communities as they relate to those interests. Step 2: Research the Topic Once students have identified a topic of interest and have refined that topic to reflect their own community, they can research that topic in more detail. They can look at details of the topic (of the river flooding, for example), the history of the topic, different community perspectives on the topic, etc. The purpose of this step is to help students understand the topic in depth so as to better identify community needs associated with the community topic or issue later on in the planning phase. Step 3: Gather/Understand Expressed Needs One of the most important parts of service-learning experiences is understanding community needs and working to fill those needs. A student might perceive the community need as protecting homes from flooding, for example, but upon diving deeper into the problem they might discover more specific needs such as assistance after flooding. In order for my students to understand real community needs so as to best serve their communities, I have them speak directly to relevant community members. They interview several community members that can express needs based on what they have personally experienced. For example, keeping the river flooding example in mind, a student might interview a community member whose home is in the river basin. They might interview a business owner, a farmer, someone who works in infrastructure or transportation. They might talk to a home insurance company. The idea is to determine needs based on those who are in the thick of community issue. Step 4: Brainstorm Service-Project Options Once students have defined a specific need that they will fill through service, they can begin brainstorming the most effective, realistic, and impactful way to serve. Students might choose to serve directly, such as volunteering to line up sandbags along the river to prevent flooding. They might serve indirectly by organizing a group of students to build rain gardens. They might serve by gathering and sharing research such as collecting data and creating a map of areas vulnerable to runoff. Or they might fill the community need through education such as organizing a speaker series with experts on protecting homes from flooding. As you can see there are a variety of different ways to fill the same need. Have students keep parameters in mind when brainstorming services projects such as whether they have the flexibility to leave the building, time constraints, financial or material limitations, etc. The examples given above could work for a variety of situations. In other words, don’t let these limitations deter you from service-learning! Step 5: Plan Service Projects Students now have a topic in mind, a defined need, and service project ideas. They can choose one of those service ideas and begin planning out the details of the experience. Students will connect with collaborators, develop a timeline, make a task list, iron out transportation details, list out and gather materials, assign tasks to different members of the group, and other project-specific details. Step 6: Write Project Plans and Have Them Approved Once students have service-learning project details in place they will write a project plan summary, share it with the instructor, and the instructor approves the project. If the project isn’t ready, the teacher can make suggestions, have student revamp their project plans, and come back to try for approval again. My method here is to have students sign up for face-to-face approval meetings with me. There are many different ways you could go about approvals. I have found one-on-one meetings to be the most effective. Step 7: Serve the Community! Those with approved projects can get started on them! This is when the facilitation and management piece on the part of the instructor really kicks in. In my opinion, daily check-ins are a must. As I said above, that might be in the form of a check-in form, a one-on-one progress meeting, group share, etc. Use that free implementation spreadsheet mentioned above! It will help you manage where each of your students or small groups are in the process and whether they require help or additional feedback from you. It is vital that you are present and available for guidance throughout the entire experience. The projects are self-directed, yes, but that puts you in the role of facilitator. Be there to support students throughout the experience. Step 8: Share Experiences I always end service-learning experiences with presentations. This piece is not required by any means, but I have found that showcasing experiences with a public audience deepens the experience and promotes quality work. I have students present their work in the form of an exhibit. So once they have completed their service projects they can begin creating a presentation or exhibit. They include photos and videos of the service that they provided, interviews, information that they gathered in the research process, handouts, relevant artifacts, community member guest speakers, and more. I invite school students and staff, parents, and community members to view exhibits. My students stand near their exhibits to answer questions and brag about their experiences. Step 9: Service-Learning Project Reflection An essential piece of experiential learning is reflecting on the learning experience. My students write out answers to service-learning reflection questions that I provide them. You can have students reflect in a variety of ways including answering specific questions, writing a reflective essay, or even verbally reflecting with you. Step 10: Evaluations I evaluate service-learning experiences with a service-learning rubric. My students self-evaluate using that rubric. Then they sign up for an evaluation meeting with me. They bring their reflections and self-evaluations to the meeting. We discuss the experience and fill in the rubric together as a final evaluation. Again, these steps are not set in stone. Use these service-learning steps as inspiration. Implement what works well for you and your students. You won’t regret it! Self-directed service-learning can be incredibly powerful for you, your students, and the community. If you love these ideas but just aren’t sure of the logistics or do not have the time or energy to create your own guiding materials, take a peek at this tool kit. Join our experiential learning Facebook group!
Did you know there is an experiential learning Facebook group? Check that out - Experiential Learning Community for K12 Teachers - and join in the discussion about experiential learning ideas such as service-learning! Find us on social media! Follow Experiential Learning Depot on Pinterest, Facebook, Youtube, and Instagram for more on experiential education, and check out my shop for experiential learning resources. Looking for relevant blog posts? Look no further! Observe. Question. Explore. Share.
0 Comments
Your comment will be posted after it is approved.
Leave a Reply. |
Blog IntentTo provide innovative educational resources for educators, parents, and students, that go beyond lecture and worksheets. AuthorSara Segar, experiential life-science educator and advisor, curriculum writer, and mother of two. Categories
All
|

 RSS Feed